Pages

Tuesday, May 20, 2014

How to Compile Java Programs through Windows CMD


How to Compile Java Programs through Windows CMD

When starting out with Java, many users get confused about compiling the code. Frequently, a programing IDE adds additional layers of confusion and complexity that complicates debugging and learning. Learning how to compile directly from within the Windows shell is an essential skill to master. These steps will walk you through installing the Java SDK and compiling your code from within the Windows terminal. These commands are case-sensitive.
First things first, you need to download the JDK from Oracle to have the latest version of Java.


 2. Follow the instructions to install the JDK. It is important to make note of the path of the JDK install.
 3.Create a central directory to hold all your Java files. For example, I created a folder at C:\java and placed my .java files and projects within this folder.
 4. Click the Windows Start icon and search for System and hit enter. Select Advanced system settings on the left and then select Environment Variables.
 5. Under System variables scroll down to the variable Path.

6. Hit Edit at the beginning of the Variable value. We need to place the path of the Java compiler into Windows’s path. The compiler should be located in the JDK bin folder. For example, from the install I recorded that my bin folder was at the following location: C:\Program Files (x86)\Java\jdk1.7.0_06\bin; but your location may be different. Be sure to include a semi-colon at the end of the string you just added. Hit OK and close this.
If this is done incorrectly, you will get the following error when attempting to compile:
‘javac’ is not recognized as an internal or external command, operable program or batch file
7. Next, we need to open a terminal window or CMD shell. Click the Windows icon and search for “CMD” then hit enter. Change to the directory of your personal java files. For example, I would input cd \java since that is the personal java folder I created above. Now our current directory within the CMD shell is c:\java.


8. Type in javac JavaFileName.java where the “JavaFileName.java” is the name of the java file you want to compile. This file can be created with any text editor or IDE and contains your actual code. After hitting the enter key, you should see a new blank line in the CMD with nothing in it Now check within your personal Java folder. If the compile was successful, you should see a new .class file.


9. To actually run the interpreter and see output type in java YourFileName without the .java extension and your program should execute. My example simply outputs some text.


Friday, January 25, 2013

outlook setting

To configure Outlook 2007 for your Gmail address:
  1. Enable POP in your email account. Don't forget to click Save Changes when you're done.
  2. Open Outlook.
  3. Click the Tools menu, and select Account Settings...
  4. On the E-mail tab, click New...
  5. If you are prompted to Choose E-mail Service, select Microsoft Exchange, POP3, IMAP, or HTTP, and click Next.
  6. Fill in all necessary fields to include the following information:
  7. Your Name: Enter your name as you would like it to appear in the From: field of outgoing messages.
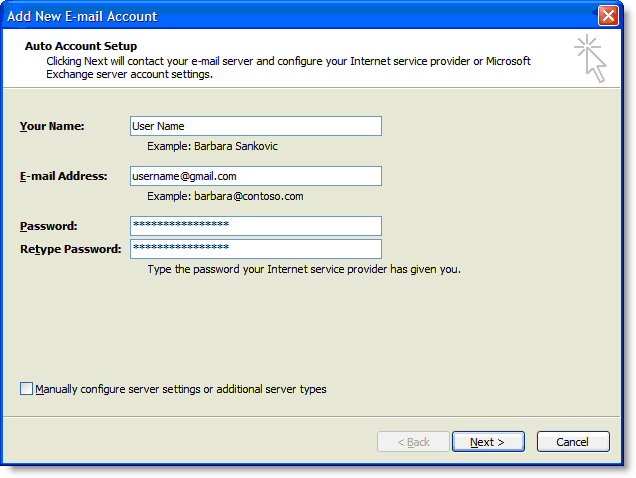
    Email Address: Enter your full Gmail email address (username@gmail.com). Google Apps users, enter your full address in the format username@your_domain.com.
    Password: Enter your email password.
    Manually configure server settings or additional server types: Leave this option unchecked if you want to automatically configure Outlook 2007. If you want to manually configure Outlook 2007, check this box now. Google Apps users should configure manually as follows.
    Enter name, email address, and password
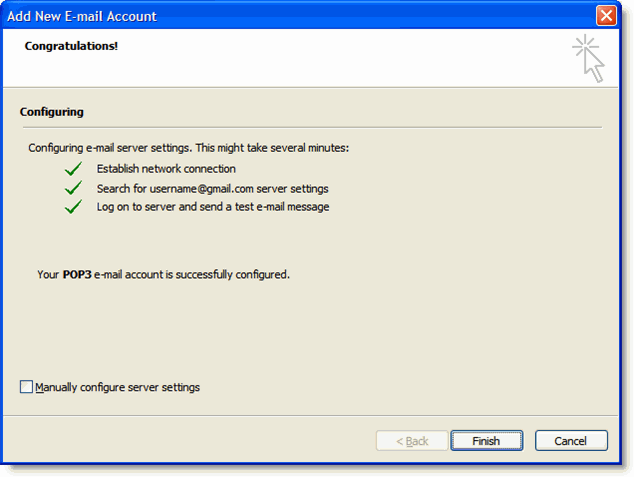
  8. Click Next. If you are configuring Outlook 2007 automatically, you're done! Just click Finish.
  9. Successful Configuration
  10. If you are configuring Outlook 2007 manually, select Internet E-mail and click Next.
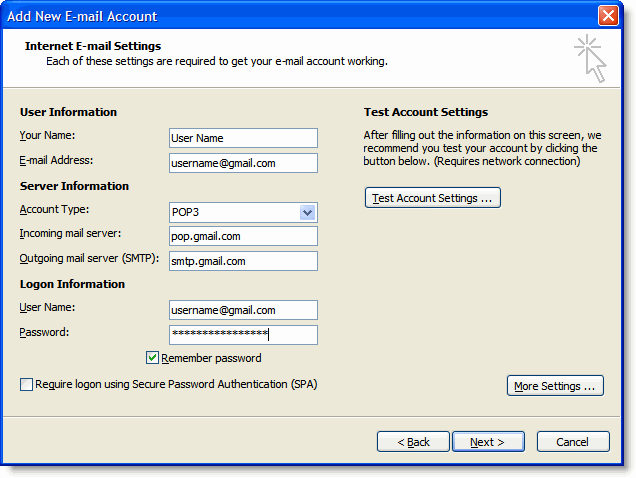
  11. Verify your User Information, and enter the following additional information:
  12. Server Information
    Account Type: POP3
    Incoming mail server: pop.gmail.com (Google Apps users, enter the server names provided, don't add your domain name in these steps)
    Outgoing mail server (SMTP): smtp.gmail.com
    Logon Information
    User Name: Enter your Gmail username (including @gmail.com). Google Apps users, enter your full address in the format username@your_domain.com
    Password: Enter your email password.
    Require logon using Secure Password Authentication (SPA): Leave this option unchecked.
    Account Settings
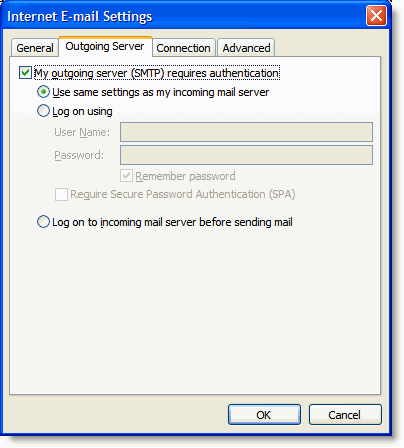
  13. Click the More Settings... button, and select the Outgoing Server tab.
  14. Check the box next to My outgoing server (SMTP) requires authentication and select Use same settings as my incoming mail server.
  15. Outgoing Server Tab
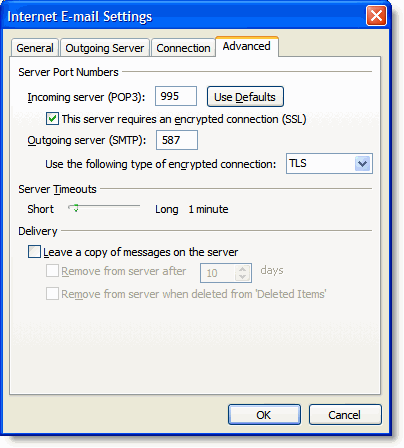
  16. Click the Advanced tab, and check the box next to This server requires an encrypted connection (SSL) under Incoming Server (POP3).
  17. In the Outgoing server (SMTP) box, enter 587, and select TLS from the drop-down menu next to Use the following type of encrypted connection:.
  18. Advanced Tab
  19. Click OK.
  20. Click Test Account Settings... After receiving 'Congratulations! All tests completed successfully', click Close.
  21. Click Next, and then click Finish.
Congratulations! You're done configuring your client to send and retrieve Gmail messages.